EDT 8140 - LMS and Evaluation
In this page I will go through the steps needed to perform the following tasks and provide an evaluation regarding the ease and quality of the result for two learning management systems, D2L and Blackboard Learn.
1. Setting up the course
2. Creating Modules
3. Adding Third-party Content
4. Creating Content Using an HTML Editor
5. Adding Images to HTML Editor Pages
1. Setting up the course
2. Creating Modules
3. Adding Third-party Content
4. Creating Content Using an HTML Editor
5. Adding Images to HTML Editor Pages
D2L Evaluation

1. Setting up the course - D2L
Setting up the course involves choosing up the format and the theme of the course and doing tasks such as adding students to the course list. The course set up options are chosen from the “Course Admin” tab on the far right of the home page. There are 28 options here to set up various components of the course including the Navigation options, overall Theme, Calendar, Quizzes, Rubrics, etc.
To add students, select the “Classlist” link on the upper right side of the Home page list of tabs. There you will find a prominent “Add Participants” link button on the upper left side of the page (see arrow in figure). If you know the participant’s Pilot ID or their name, you can search the database to locate them and assign them to the correct role (student).

2. Creating modules - D2L
Adding modules is performed on the “Content” tab. At the bottom of the list of actions on the left column, click on the “Add a module” link (see arrow in figure). Type in a name for the module and it will be created. The modules can be modified to add restrictions such as dates the module is available. Also from this page, activities and other materials can be added such as files, discussions, links and quizzes to name a few.
Adding modules is performed on the “Content” tab. At the bottom of the list of actions on the left column, click on the “Add a module” link (see arrow in figure). Type in a name for the module and it will be created. The modules can be modified to add restrictions such as dates the module is available. Also from this page, activities and other materials can be added such as files, discussions, links and quizzes to name a few.

3. Adding third party content - D2L
Third-party content can be added to any module as widgets. Choose a module from Table of Contents on the Content tab. Then select “Add Existing Activities” and then “External Learning Tools” from the pop-up window (see arrow in figure). This will open a pop-up window with a list of third-party learning tools. Select the one you want included in your module.
Third-party content can be added to any module as widgets. Choose a module from Table of Contents on the Content tab. Then select “Add Existing Activities” and then “External Learning Tools” from the pop-up window (see arrow in figure). This will open a pop-up window with a list of third-party learning tools. Select the one you want included in your module.

4. Creating content using an HTML editor - D2L
Content can be added to a module as HTML text. As described above, first choose a module from the Table of Contents on the Content tab. Then select “New” and then “Create a File” from the pop-up window (see arrow in figure). This will open an HTML editor with all the typical functions such as bold, italic and underline text (and others), alignment and font options, mathematical equations and tables. Additionally, files can be uploaded and text can be defined as hyperlinks. These various functions provide a wide array of capabilities.
Content can be added to a module as HTML text. As described above, first choose a module from the Table of Contents on the Content tab. Then select “New” and then “Create a File” from the pop-up window (see arrow in figure). This will open an HTML editor with all the typical functions such as bold, italic and underline text (and others), alignment and font options, mathematical equations and tables. Additionally, files can be uploaded and text can be defined as hyperlinks. These various functions provide a wide array of capabilities.

5. Adding images to HTML editor pages - D2L
Images are added with ease via the HTML editor. On the option bar of the HTML editor is a button for adding images. First position the cursor in the document where you want the image to appear. Then select the image button (see arrow in figure). This will open a window in which you can either browse for the image on your computer or on the web, or drag and drop your image. Once the image is in the HTML document, it can be sized and positioned to either margin or to the center of the page.
Images are added with ease via the HTML editor. On the option bar of the HTML editor is a button for adding images. First position the cursor in the document where you want the image to appear. Then select the image button (see arrow in figure). This will open a window in which you can either browse for the image on your computer or on the web, or drag and drop your image. Once the image is in the HTML document, it can be sized and positioned to either margin or to the center of the page.
Blackboard Learn Evaluation
1. Setting up the course - Blackboard Learn
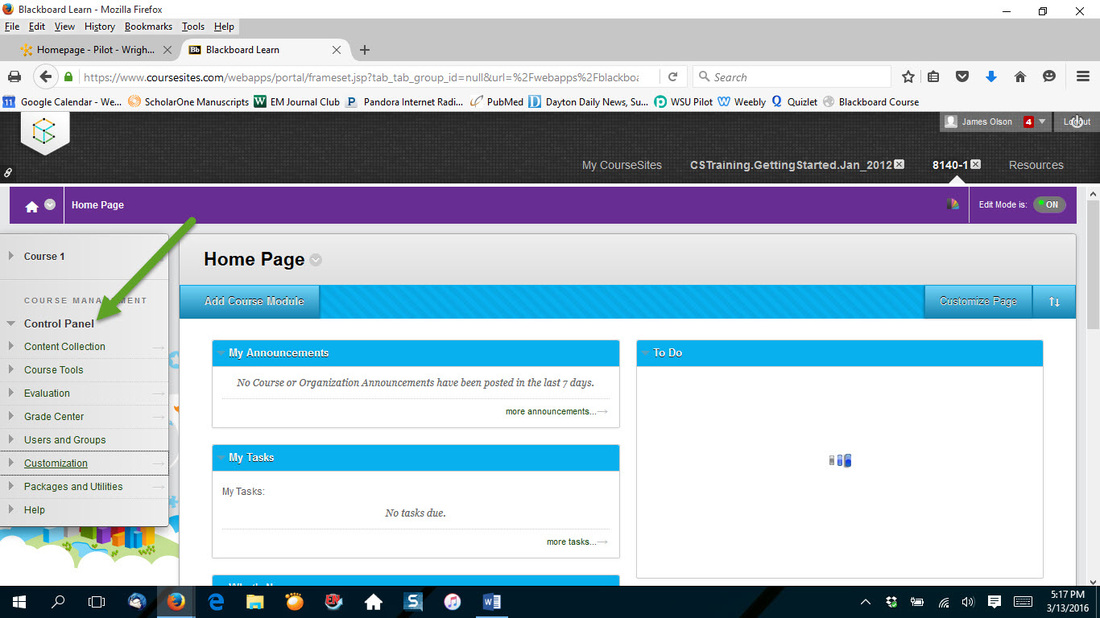
After logging into the Blackboard Learn CourseSite page, an option to “Create a Course” is provided. Clicking on this leads you to three choices; Import a Course Package, Create a New Course, or Get A Trial Course. As a start, chose to Create A New Course. The program prompts you to fill in a form with the course name, course identification number, and a brief description of the course. The site then presents a Quick Setup Guide that allows the instructor to select the course structure (e.g. activity or lecture/chapter based) and theme. Once these options are selected, the remainder of the course setup is done under the “Course Management” and “Control Panel” selections on the left column (see arrow in figure)
Students can be self enrolled or enrolled only by the instructor. There also is an option to invite students by email.

2. Creating modules - Blackboard Learn
Once the course is set up, the program brings the user to a home page. A prominent button invites the user to “Add Course Module”. Clicking on this button opens a page with a variety of links and tools that may be added. For example a Calculator can be added. The link or tool will be added to the current page. If a content page has not been created, the tool will appear on the home page.
To add a content module, click first on the “Content” link in the left column. Mouse over Build Content to open a pop-up that will allow you to create a new Module Page (see arrow in figure). Then by opening that module page, these links and tools can be added via the “Add Course Module” button.
3. Adding third party content - Blackboard Learn
In CourseSites, third party content is accessible when adding course modules to each module page. See the embedded video for complete instructions. Third party content is available when adding course materials to the course module pages. CourseSites offers a variety of choices including a dictionary and a variety of NBC video feeds.
In CourseSites, third party content is accessible when adding course modules to each module page. See the embedded video for complete instructions. Third party content is available when adding course materials to the course module pages. CourseSites offers a variety of choices including a dictionary and a variety of NBC video feeds.

4. Creating content using an HTML editor - Blackboard Learn
Content can be created with a limited function HTML editor. In the Content page, select “Build Content” to open the pop-up and then select “Item” (see arrow in figure). Name the item and then enter the HTML editor. There are a few functions available here including some basic text embellishments and bullet lists. Hyperlinks also can be defined for words in the text. Text can be copied into this window with the copy-paste commands (Ctrl-C – Ctrl-V). This also can be done for images (see number 5 below)
Content can be created with a limited function HTML editor. In the Content page, select “Build Content” to open the pop-up and then select “Item” (see arrow in figure). Name the item and then enter the HTML editor. There are a few functions available here including some basic text embellishments and bullet lists. Hyperlinks also can be defined for words in the text. Text can be copied into this window with the copy-paste commands (Ctrl-C – Ctrl-V). This also can be done for images (see number 5 below)

5. Adding images to HTML editor pages - Blackboard Learn
There is no dedicated image insertion tool in the HTML editor for content items. However, images can be added by using the copy-paste commands (Ctrl-C, Ctrl-V). Once the image is entered, it can be resized by moving a corner of the image to expand or shrink it. The images remain inline with the text. That is, text can be added below an inserted image.
Another method for adding an image is to add the image as an attachment to the item. The attachment tool appears below the HTML editor on the Item page (see arrow in figure). In this case the image will be shown at the bottom of the item and cannot be moved elsewhere.
LMS Weekly Recommendation
1. For both learning management systems, the course setup was simple. However, Blackboard Learn offered a step-by-step guide which would smooth the task for new users.
Score: Blackboard – 1 : D2L – 0
2. Creating modules was more intuitive using D2L than in Blackboard Learn. This is because the steps that followed the module creation to include content were easier to understand at first trials in D2L.
Score : Blackboard – 0 : D2L – 1
3. Adding third party content was similar in each learning management system. There also were a variety of content options available for each.
Score : Blackboard – 1 : D2L – 1
4. D2L facilitated creating content with the HTML editor better than was available in Blackboard Learn. There were more text font and style options in D2L as well as other capabilities that Blackboard Learn did not offer.
Score: Blackboard – 0 : D2L – 1
5. Finally, adding images in the HTML editor was similar in each learning management system. Although Blackboard Learn did not have a dedicated image insertion tool in the HTML editor, it still was easy to copy and paste images into the HTML document as it was being created.
Score: Blackboard – 1 : D2L – 1
Final score:
Blackboard – 3 : D2L – 4
A slight margin of victory for the D2L system.
